tutorial
the parts of a bambi window, and how to use them
Every bambi plugin is laid out the same way, so what you learn in one works in the others.
At the top is the header. Below it on the left is the scene, a picture of the sphere around you, and under that the modulation matrix. On the right are the plugin's own tabs, and at the far right its levels. This page walks through each part: what it is for, and what you can do with it.
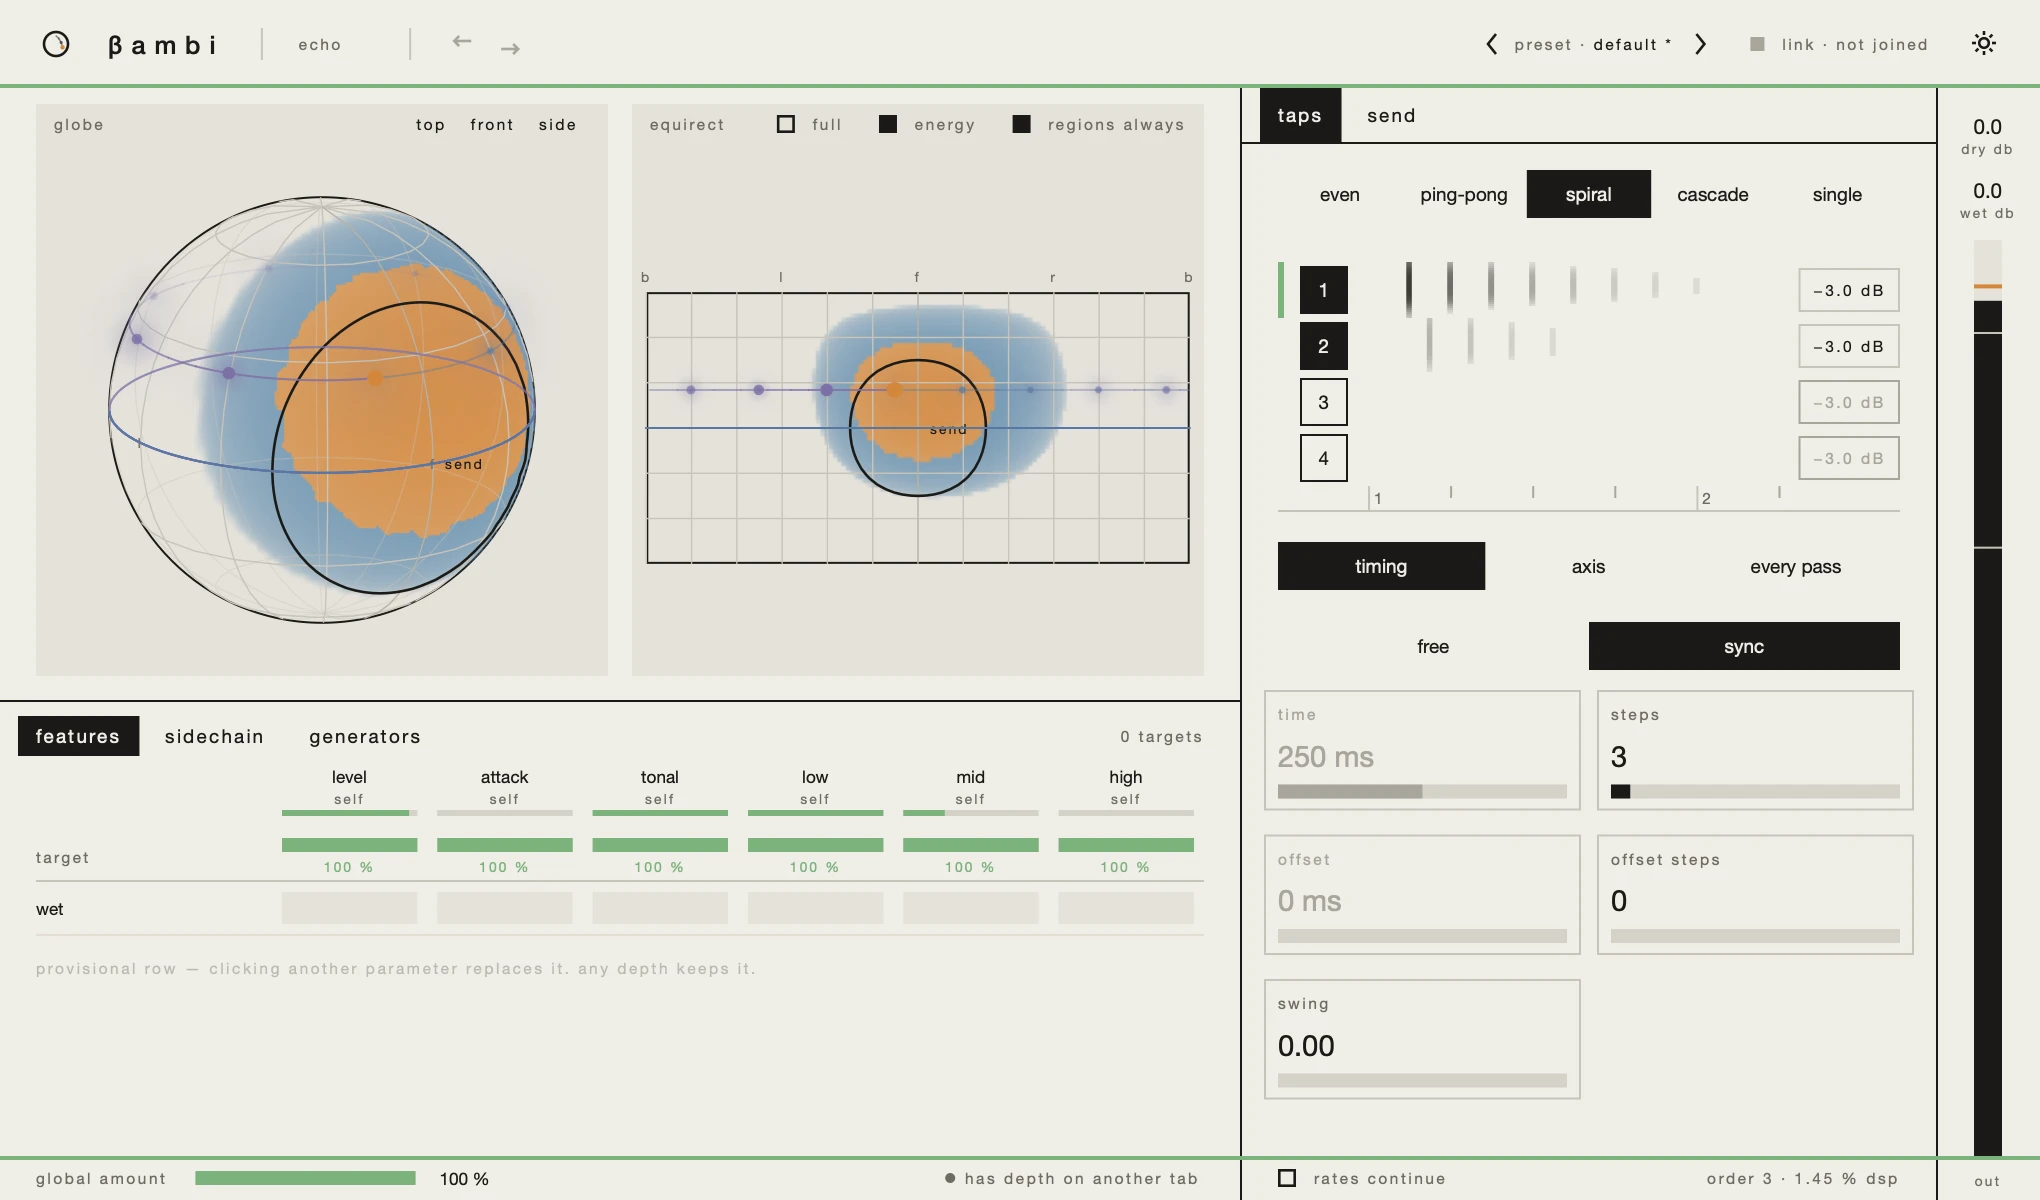
the header

From left to right:
- The mark and the plugin's name. Clicking them takes the window back to its own instance when it is showing another one.
- Undo and redo, the two arrows. Every edit can be undone, including a preset load and a drag in the scene.
- The instances, as tabs. Every instance of this plugin in your project has a tab, named after it. Click one and the whole window turns to that instance: the matrix, the tabs and undo all edit it from here. The open tab is the black block. With many instances the tabs shrink, then scroll with the mouse wheel.
‹ preset · name ›. The chevrons step through the presets, and the name opens the preset browser. A*after the name means you have changed the sound since loading it.- The link: which session this instance is in, and how many instances share it.
- Settings, the last glyph.
the scene
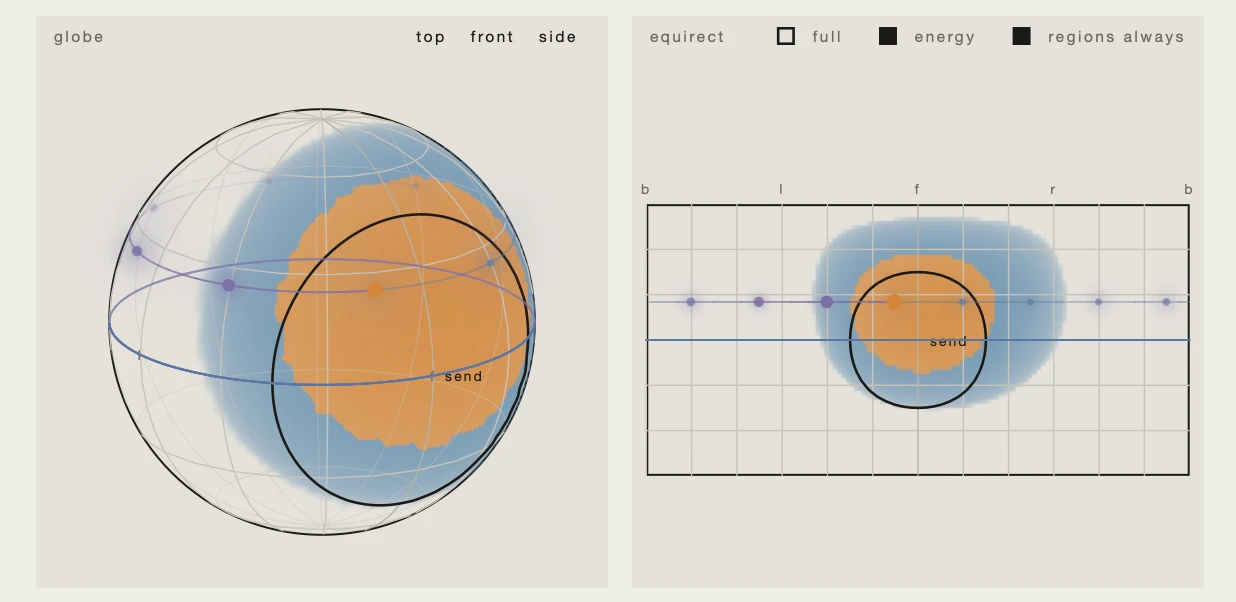
The scene shows the sphere around the listener twice. On the left is the globe, a ball you look at from outside. On the right is the equirect, the whole sphere unrolled flat: left to right is all the way round, bottom to top is floor to ceiling. The letters along the top mark back, left, front and right.
- Drag the globe to turn it.
top,frontandsidesnap it to a view. fullgives the equirect the whole width.energyshows where the sound is. What came into the plugin is drawn in orange, and what the plugin adds in blue. The picture is off when a window opens, because it is the one thing in the window that costs processing.regions alwaysdraws every region's outline. Turn it off and you see only the region whose tab is open.- Click a direction in the echo or the reverb to place the probe, a small orange dot. The plugin then draws what it would do to a sound from there: the echo's repeats as they travel, or the reverb's reflections where they arrive. The probe is worked out from the settings, not from the audio, so it answers even while nothing is playing.
the modulation matrix
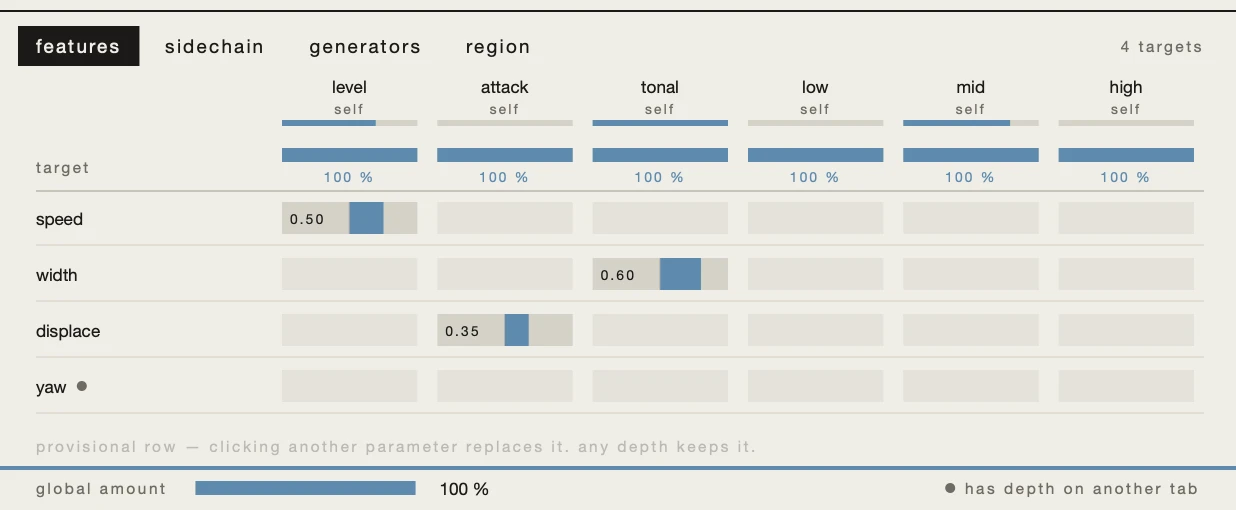
The matrix is how something moves by itself. Its columns are sources, things that change over time. Its rows are targets, the parameters they move. A cell is how much one source moves one target.
The sources come in tabs:
- features are measurements of the input:
level(how loud),attack(how sharp the onsets are),tonal(how sustained or pitched), andlow,midandhigh(how much there is in each part of the spectrum). Each reads zero in silence, so silence moves nothing. - sidechain has the same six, measured on the sidechain input instead.
- generators are three LFOs and three envelopes.
- region, in the encoder only, is how far the source is inside its region.
Under each source's name, the thin bar shows what it is sending right now, so you can see what a depth would do before you set one. The thicker bar under that is the source's amount, which scales every cell in its column.
making a row
There is always at least one row. To add another, click any value on the plugin's tabs. Its row appears with a dashed outline, as a provisional row. Clicking another value replaces it, and giving it any depth keeps it. Two clicks and a drag is the whole vocabulary:
- Click the value you want to move, say
width. A row appears. - Click a cell in it, say under
tonal. It gets a depth of 0.50. - Drag the cell up or down to set how much. Now the sound widens as it rings.
- Drag a cell up for more and down for less. A negative depth moves the target the other way.
- Hold shift while dragging for fine steps.
- Click a cell to switch it between 0.50 and empty. Double-click it to empty it.
- A dot after a row's name means that row has depth on another tab.
global amount, at the bottom, scales all modulation at once.
a source's page
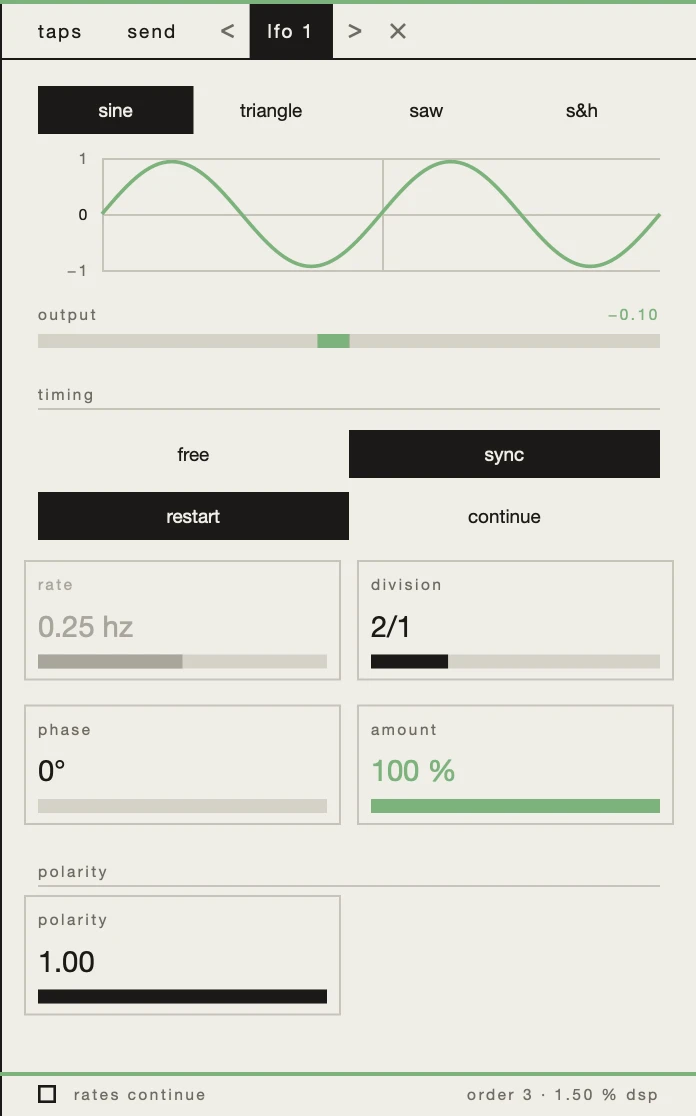
Click a source's name at the head of its column, and its settings open as an extra tab on the right, named for the source. < and > step to the neighbouring sources, and × closes the page. Clicking the name again closes it too.
Every source's page shows its live output near the top. After that it depends on the kind of source:
- An LFO has its wave (
sine,triangle,saw,s&h), its timing,phase,amountandpolarity. Timing isfree, aratein hertz, orsync, adivisionof the bar. Both are shown, and the one not in use is greyed.restartties the LFO to playback, so it starts in the same place every time you press play;continuelets it run on. - An envelope has two tabs.
shapeholds attack, decay, sustain and release: drag the corners of the graph, or the middle of a line to curve it.triggersays what sets it off: MIDI notes, or a feature crossing a threshold. - A feature has its amount, and
levelalso has arelease: how quickly it falls when the sound stops.
polarity sets where a source rests. At 0 it only pushes one way, from zero up. At 1 it swings both ways, about zero.
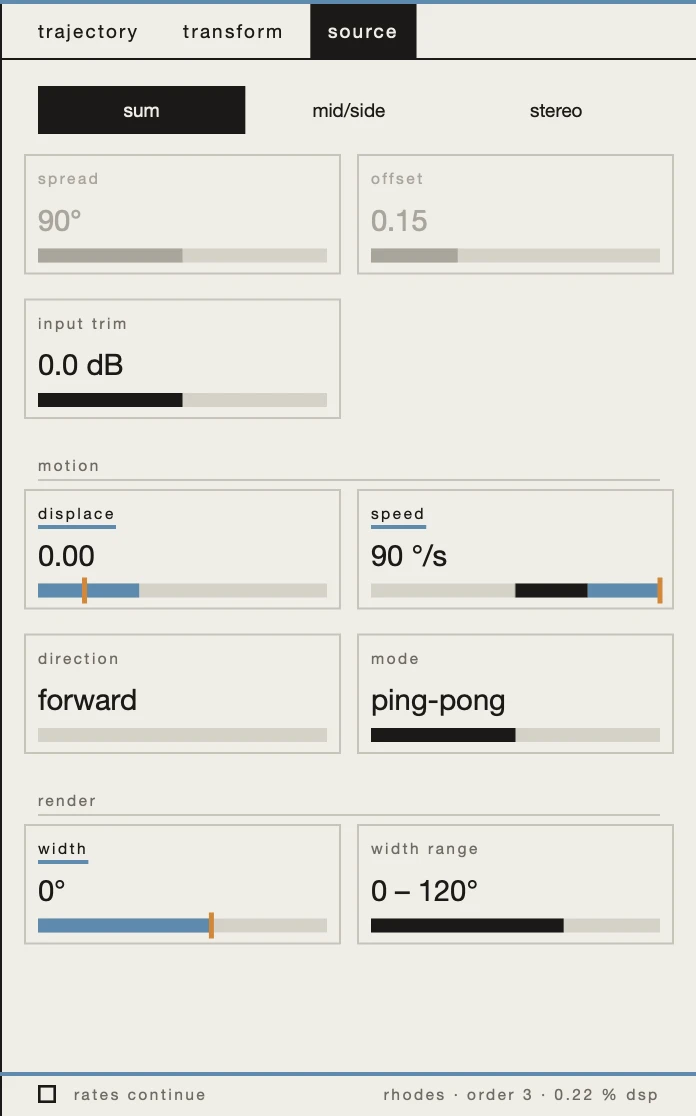
the panel and a value
The right-hand side holds the plugin's own controls, in tabs organised by what each thing acts on. The open tab is the black block. A long page scrolls under its tabs.
Every value is one box: its name, its number and a bar. The whole box is the control.
- Drag anywhere in it, up for more and down for less. Hold shift for fine steps.
- Double-click to return it to its default. On an angle that means exactly zero, and it also clears any turning a rate has added.
- Click to give it a row in the matrix. A value that is a choice, like
directionormode, steps to its next option instead. - Values that go round, like angles, wrap: drag past one end and they come back in at the other.
Three signs on a box:
- An underline under its name, in the plugin's own colour, means something in the matrix moves it.
- A band in the plugin's own colour along the bar shows how far the modulation reaches.
- A small orange mark shows where the value actually is right now, when that differs from what you set: an angle turned by its rate, a source carried along its path. The number and the fill always stay what you set, which is what is saved and what automation records.
A greyed box is not in use right now. One click on the choice above it brings it back.
regions
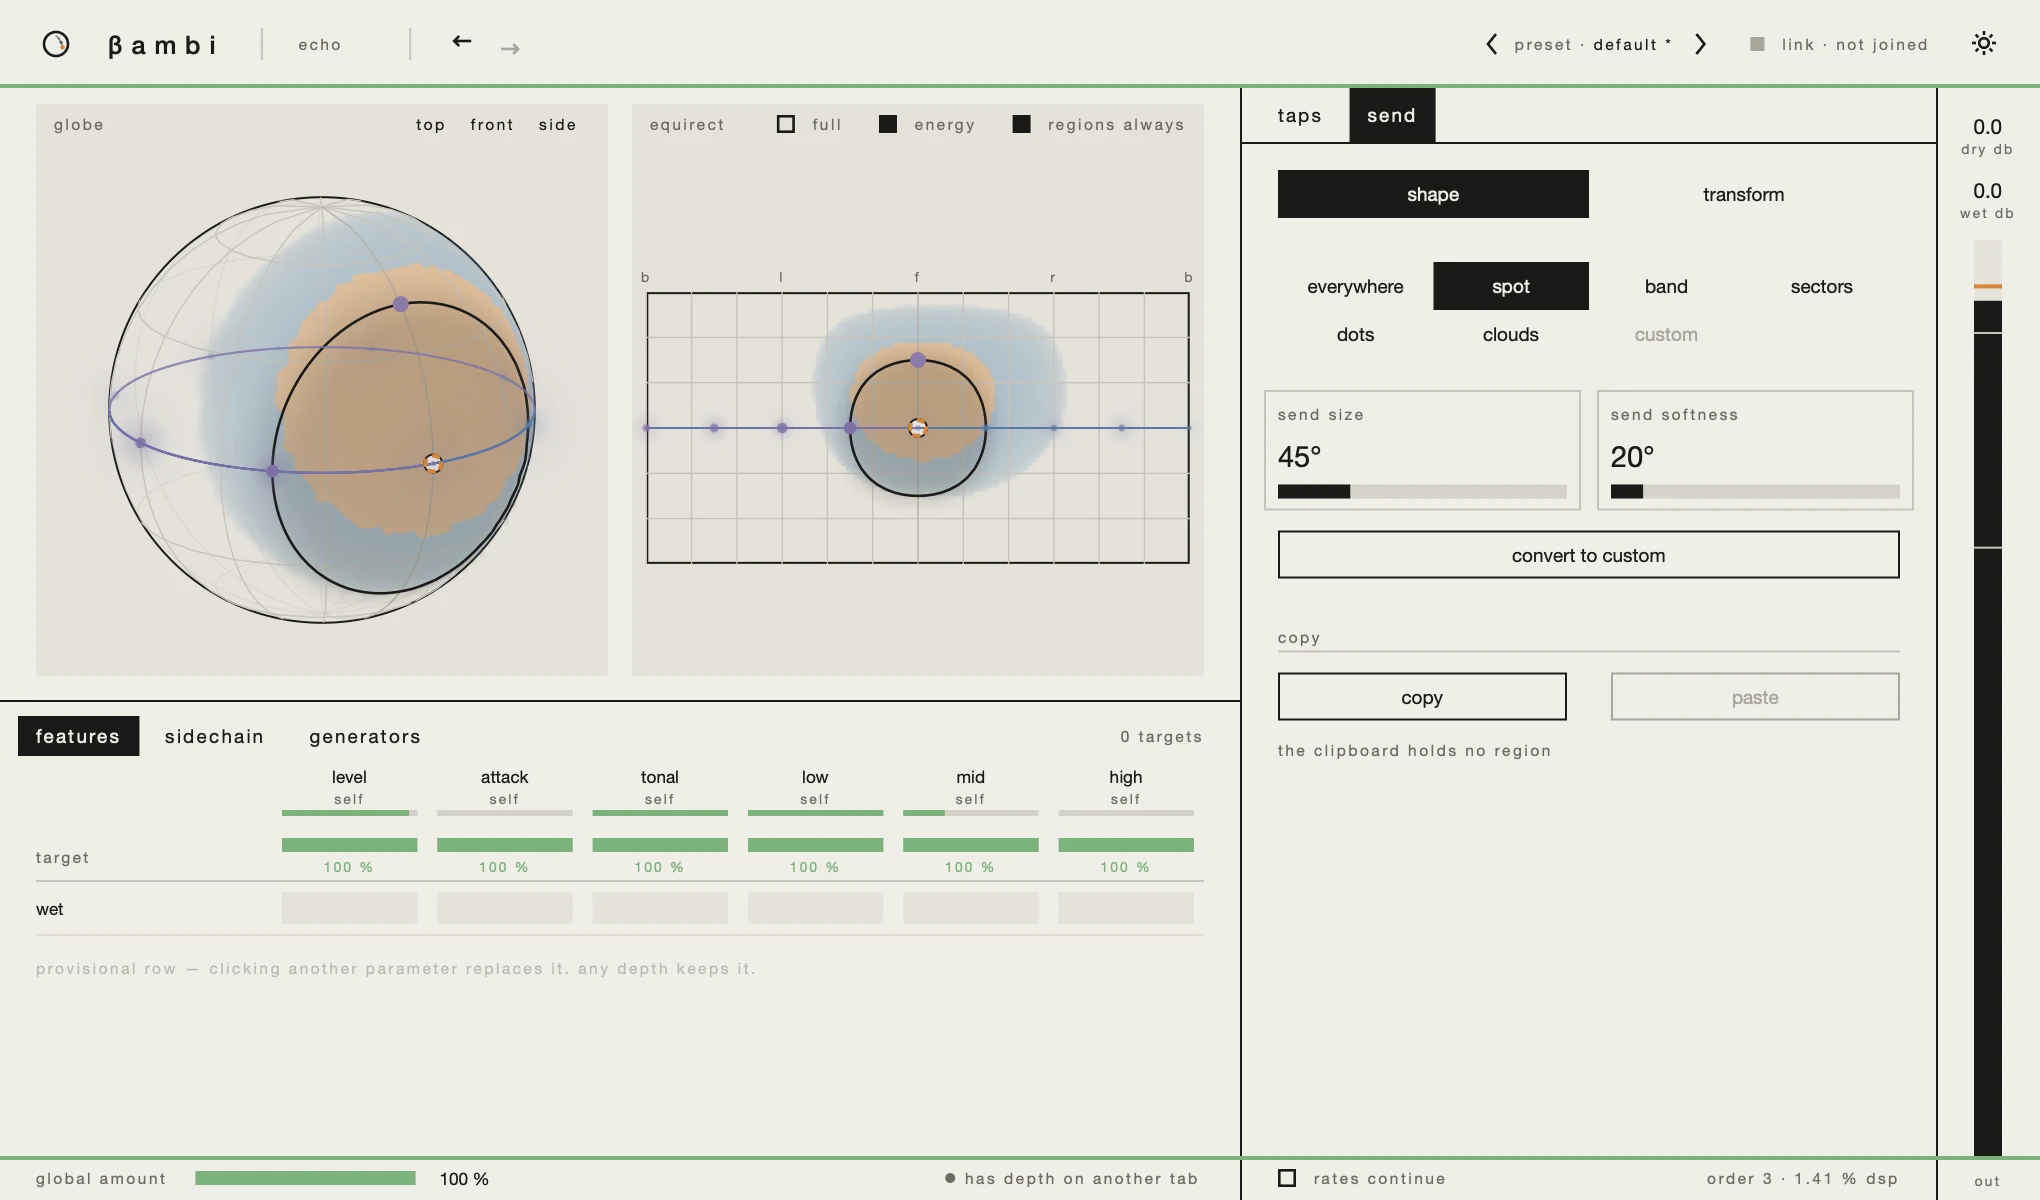
A region says where on the sphere something happens: which part of the field the echo hears, or where the reverb's room comes back. Each plugin has a fixed set, each on a tab of its own: the echo has a send, the reverb a send and a return. In the encoder the region is a source in the matrix instead (below).
A region's tab opens with its kind: everywhere, spot, band,sectors, dots, clouds or custom. Under it are that kind's own settings, such as a spot's size or a band's elevation, and a softness for how gently the edge fades. The kind is chosen once; its settings and the region's orientation can all be automated and modulated.
shapeandtransformsplit the tab.shapeis the kind and its settings.transformisyaw,pitchandroll, each beside a rate that keeps it turning, then whether the region lets through what isinsideor what isoutside, and how much.- In the scene, a region is drawn in ink: its edge where it is half open, and a light wash where it fades. While its tab is open it has handles. Drag the white circle to aim it and the others to roll it or move its edge; double-click a handle to reset it.
convert to customfreezes the shape into a grid of weights you can edit one by one. The kind and its settings are kept underneath, so you can go back to them.copyandpastecarry a region to another instance, or to another plugin. Paste a reverb's return into an echo's send, and the echo is fed exactly where the room comes back. The line under the buttons says what the clipboard holds. A copy is a copy: nothing stays connected afterwards.
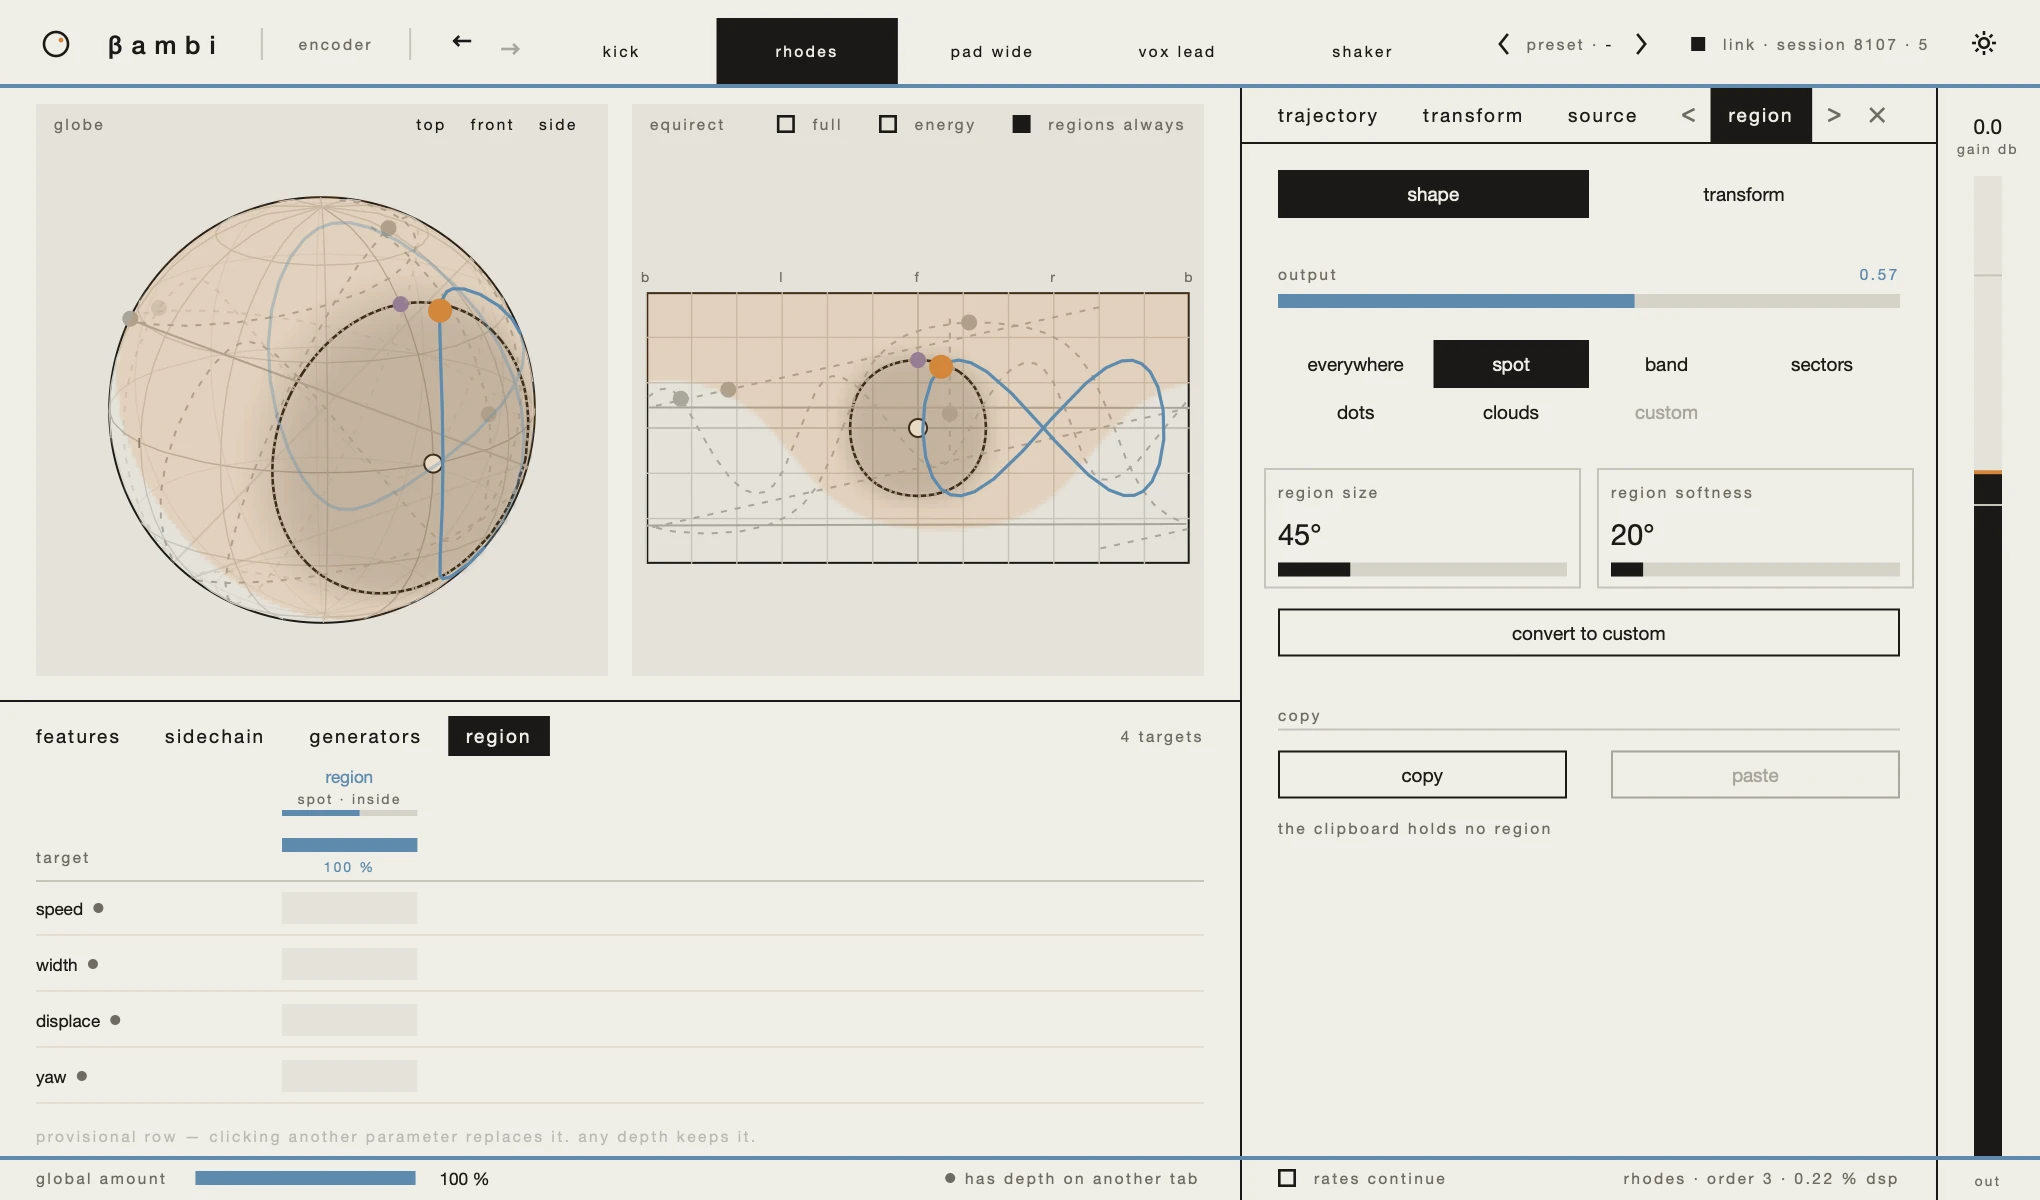
In the encoder, the region's value is how far the source is inside it: 1 inside, 0 outside, and in between across the soft edge. Route it like any source to make a sound slow down, widen or fall quiet as it passes through part of the room.
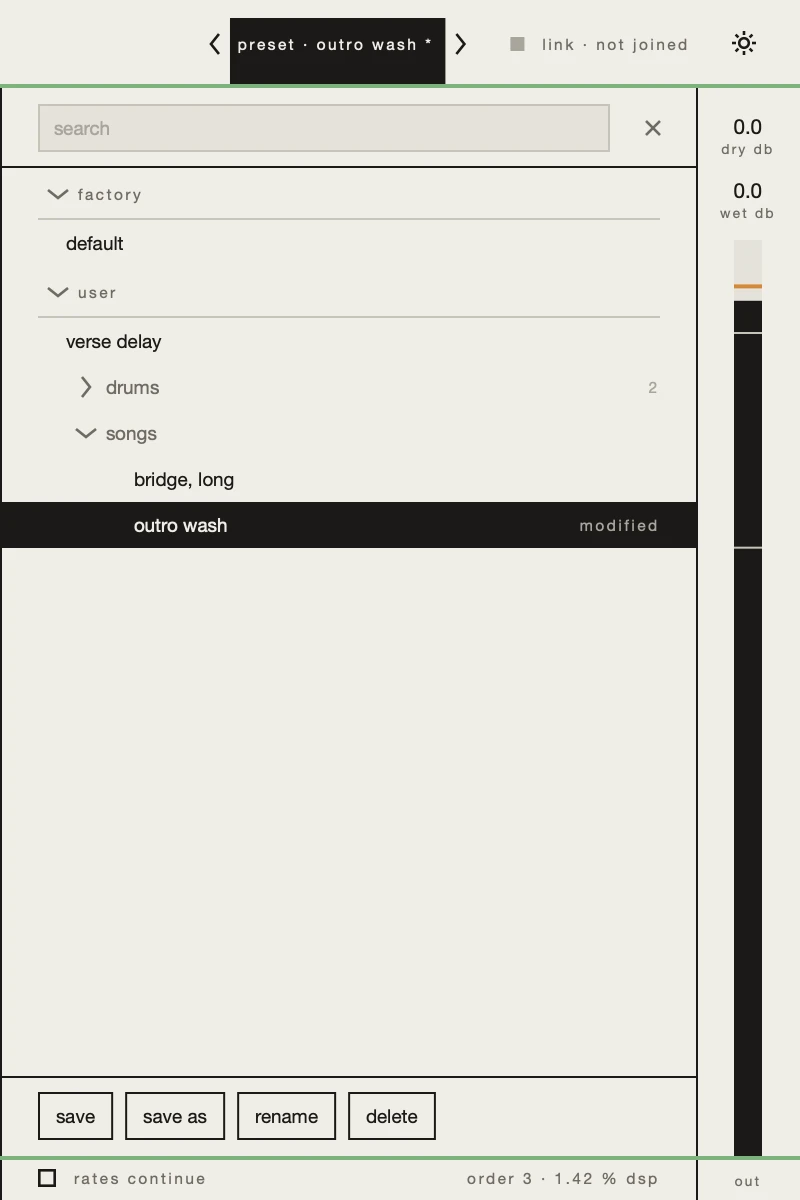
presets
A preset is the whole sound of an instance: every parameter, the matrix, the regions, the plugin's own settings. It does not include the instance's name or its place in the session.
Click the preset name in the header and the browser opens over the panel, so the scene and the matrix stay in sight while you try things.
- Type to search, straight away. The search matches folders as well as names.
- One click loads, and the browser stays open for the next. ↑ and ↓walk the list, return loads, escape clears the search and then closes.
- A load is one step of undo, so a preset you did not like is one undo away.
save,save as,renameanddeleteare at the bottom. A slash in a name makes a folder: saving asdrums/tightfiles it underdrums.- Delete asks first, and moves the file to the trash.
factory presets are built into the plugin and cannot be changed. user presets are files of your own, shared by every project.
the link
Every bambi instance in a project joins one session by itself, with no setup. The session is saved with the project and comes back when you reopen it. The header shows the session and how many instances are in it.
- Every window can edit every instance of its plugin. Pick one from the header's tabs and the whole window turns to it; undo acts on the instance shown.
- Other instances appear in the scene in grey: in the encoder, every source and its path; in every plugin, other instances' regions as dotted outlines. They are only drawn; nothing about them reaches the sound.
- The link carries edits, never sound. No instance's audio depends on another instance, so freezing a track or bouncing stems gives the same result as the full mix.
settings
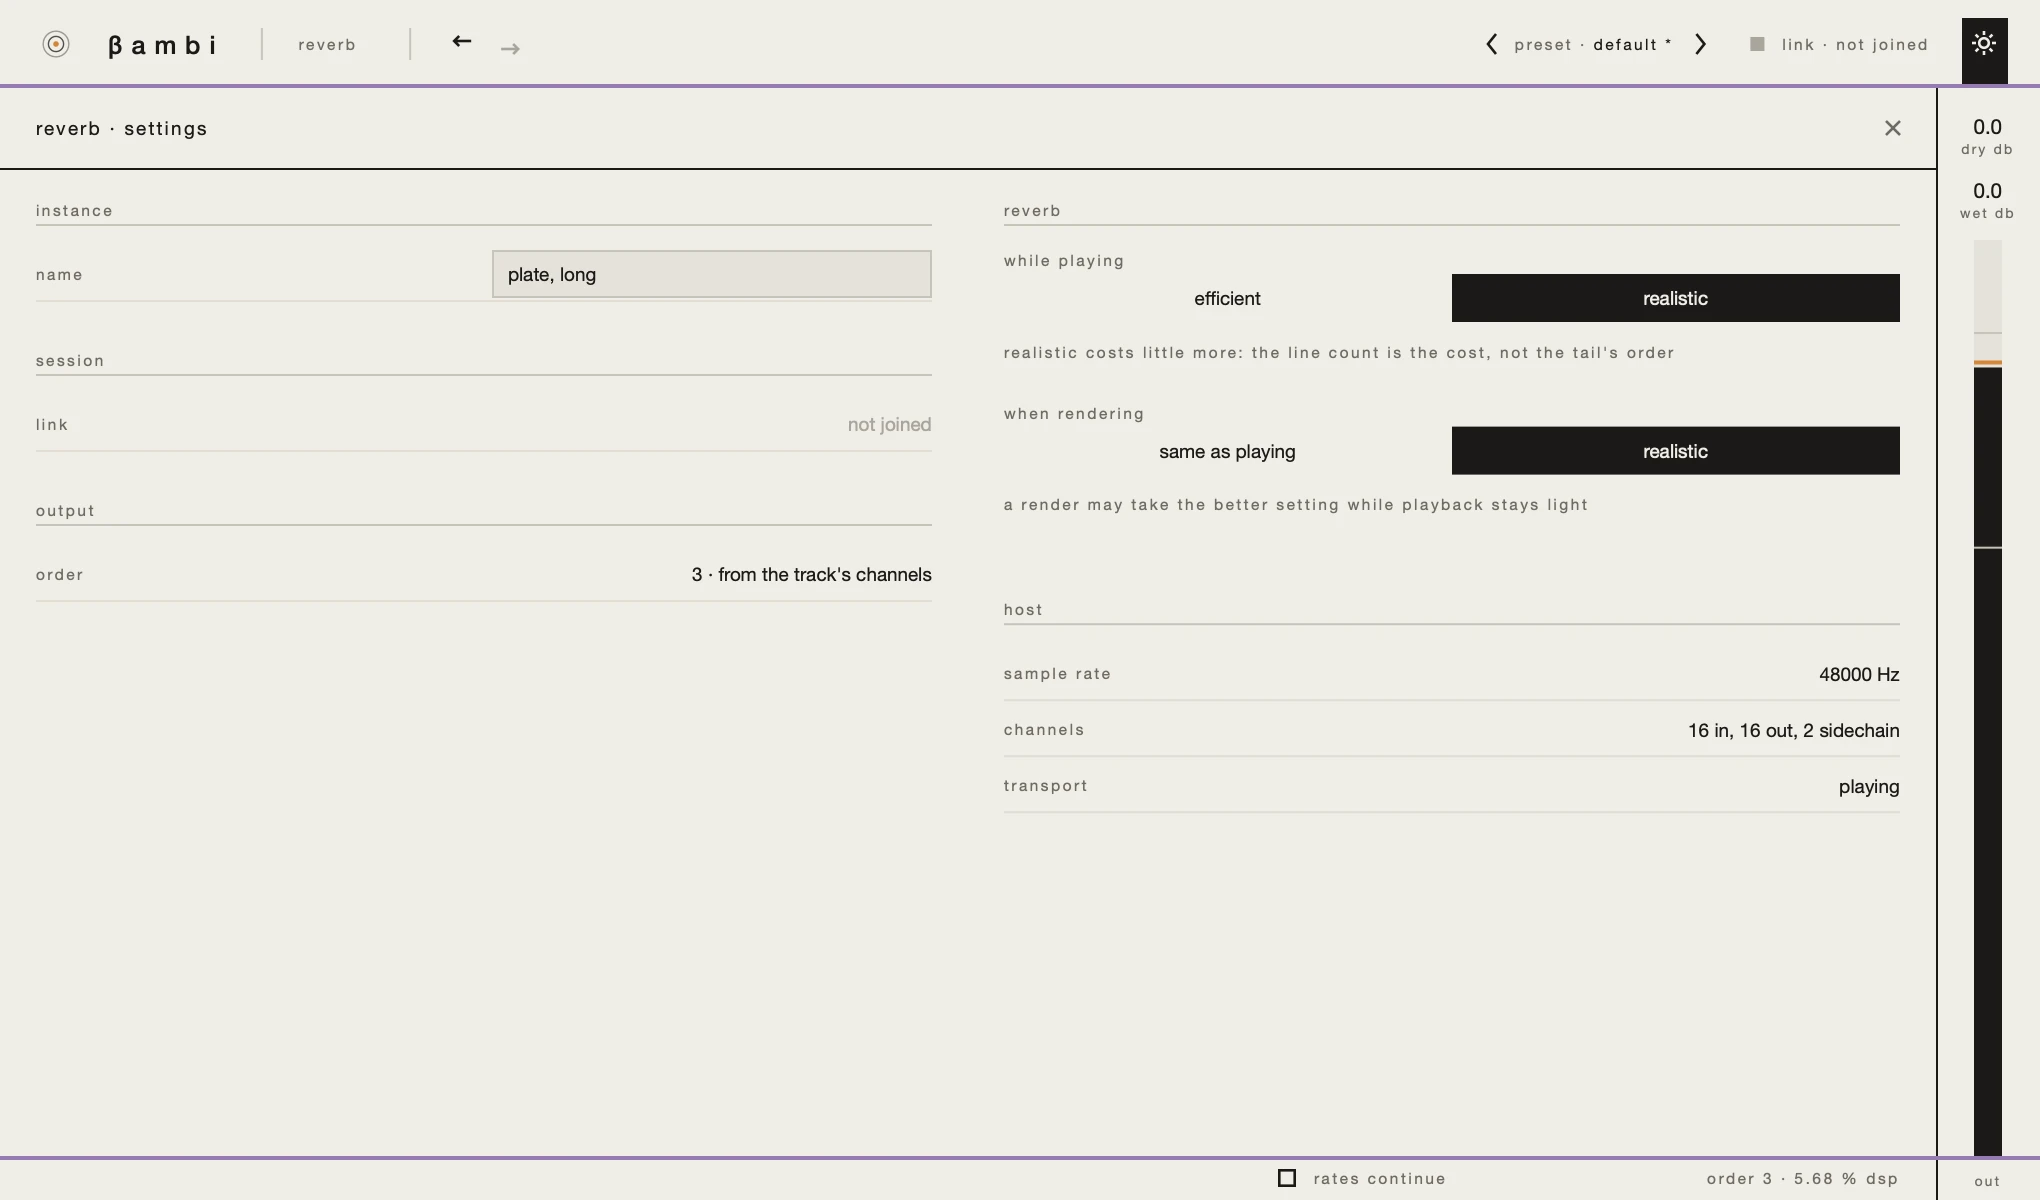
The glyph at the end of the header opens settings over the window. On the left is what every instance has: its name, which you can type (return or escape hands the keyboard back to your host), the link session, and the ambisonic order, which comes from how many channels the track has. On the right is what only this plugin has, such as the reverb's quality while playing and while rendering, and what the host reports.

levels and the footer
The column at the far right holds the plugin's levels, in decibels: dry andwet in the echo and the reverb, gain in the encoder. They are values like any other: drag them, double-click for the default, click to give them a row in the matrix. Under them is theoutput meter, marked out, which always shows this window's own instance.
Ducking needs no control of its own. Click wet, then set a negative depth underlevel, or under the sidechain's level, and the effect gets out of the way while the sound plays. level's release sets how quickly it comes back.
The footer, under the panel, holds rates continue and a readout: the instance's name, its order, and the share of one processor core it is using. Withrates continue off, as it starts, everything that turns at a rate (a path, a rotating region) holds while the transport is stopped and starts from the same place every time you press play, so a bounce sounds like what you heard. Switched on, they run all the time, and a bounce no longer repeats exactly what you heard.
